Our Fallout New Vegas Hollowed-Out Rocks Locations Guide shows the total of 42 Hollowed-Out Rocks in the PC, Xbox 360 and PS3 game.
Hollowed-Out Rocks just contain random items from ammo to health to just other regular items or food.
You could even store items you are carrying in a rock if you wanted to also. A good location to store your items is on Jacobstown as where you spawn when you fast travel there, it is right where you spawn. You can then quickly exchange or drop items as you fast travel without having to do multiple loads such as you would have to if you kept your items in Lucky 38 Casino for example.
Our Fallout New Vegas Unique Weapons Locations Guide shows the total of 42 unique weapons to be found in the PC, Xbox 360 and PS3 game.
These Unique Weapons have better stats than those of the regular versions of these weapons, if there is one, that you would find in the game. For example, the 9mm Pistol: Maria that you get from killing Benny has better stats than the regular 9mm.
You may come across these weapons throughout the game on your own, or you may have to explore and walk some to find other ones. Some of these weapons can be bought, for example “That Gun” Location #11 can be bought or stolen at Dino Bite Shop. It is your choice to buy it, if you have enough caps or to steal it if you feel as if you want that weapon or to steal it to sell it.
There is no specific order to these unique weapons, I have gone ahead and ordered them first by the type of weapon and then ranked by how powerful they by default to least in each category. Do not assume that since the weapon is on top, that it would be better for your character or for you to use throughout the entire game and/or every enemy. All of these depend on your type of character and skills.
You can only get this weapon by killing Old Lady Gibson. If you decide to kill her, your karma will decrease. It is up to you to decide if you feel as if this shotgun is worth it with its stats.
Also be warned that if you decide to kill her, you may want to complete the Side Quest called “Nothin’ But A Hound Dog” if you plan on wanting the attack damage versus either increased speed or increased toughness then you will need to keep Old Lady Gibson alive till afterwards.
You cannot get it by sneaking and pickpocketing it from her, or any other way.
Our Fallout New Vegas Companions Locations Guide shows the total of 8 companions, also known as followers, in the PC, Xbox 360, and PS3 game. While you can have all companions, only 1 humanoid and 1 robotic can follow you at a given time. You will need to send the others to Lucky 38 Casino where you can swap companions anytime you want, if you choose to change them up at anytime.
Companions can only die if you are playing Hardcore mode, otherwise they can never die in Normal or any other difficulty modes. If you are playing in Hardcore mode and using companions, make sure to save periodically and before you go into battles.
By just recruiting 1 companion you will unlock the “Ol’ Buddy Ol’ Pal” Achievement worth 10 Gamerscore or a Bronze Trophy.
By recruiting all 8 of the companions in the game, you will unlock the achievement called “The Whole Gang’s Here” worth 25 Gamerscore or a Silver Trophy.
Location: Craig Boone is one of the first companions you should come across near the start of the game. But he does not have to be the first nor may he be the first. There is no specific order.
Info and Quests: He is very easy to get recruit from the beginning to and he offers a lot of help to you, especially if you have gone ahead and decided to play Hardcore mode. He pairs great with either ED-E or Rex.
You can find him inside of the dino’s mouth guarding the town of Novac after 9PM. You will need to complete the side quest “One For My Baby” that he gives you by talking to him in order for you to be able to recruit him to follow you.
Perk: Spotter automatically marks hostile targets in the area, this can help at night in case you do not spot an enemy or to differentiate between a friend or an enemy.
Upgrade 1: 1st Recon Beret that gives you +1 Perception and +5% Critical Chance. You will get this upon completing the 1st Quest with Boone.
Upgrade 2: 1st Recon Survival Armor or 1st Recon Assault Armor when you complete the 2nd Quest from Boone. The only difference between this armor is cosmetic, it is your choice as to which one looks better to you.
Our Fallout New Vegas Snow Globes Locations Guide shows the total of 7 snow globes in the PC, Xbox 360 and PS3 game. They are similiar to the Bobble Heads that were in Fallout 3 except this time collecting them does not enhance your character at all, but instead you can either keep them for your collection or sell each of them for 2,000 caps each to Mr. House.
Once you have found and collected all 7 snow globes in the game, you will unlock the Globe Trotter Achievement worth 25 Gamerscore or a Silver Trophy.
You can get this Snow Globe right at the beginning of the game. It will be found at the Goodsprings Cemetery which is at the top of the hill from Goodsprings. It is lying in a grave right near the water tower that is also located up here at the cemetery.
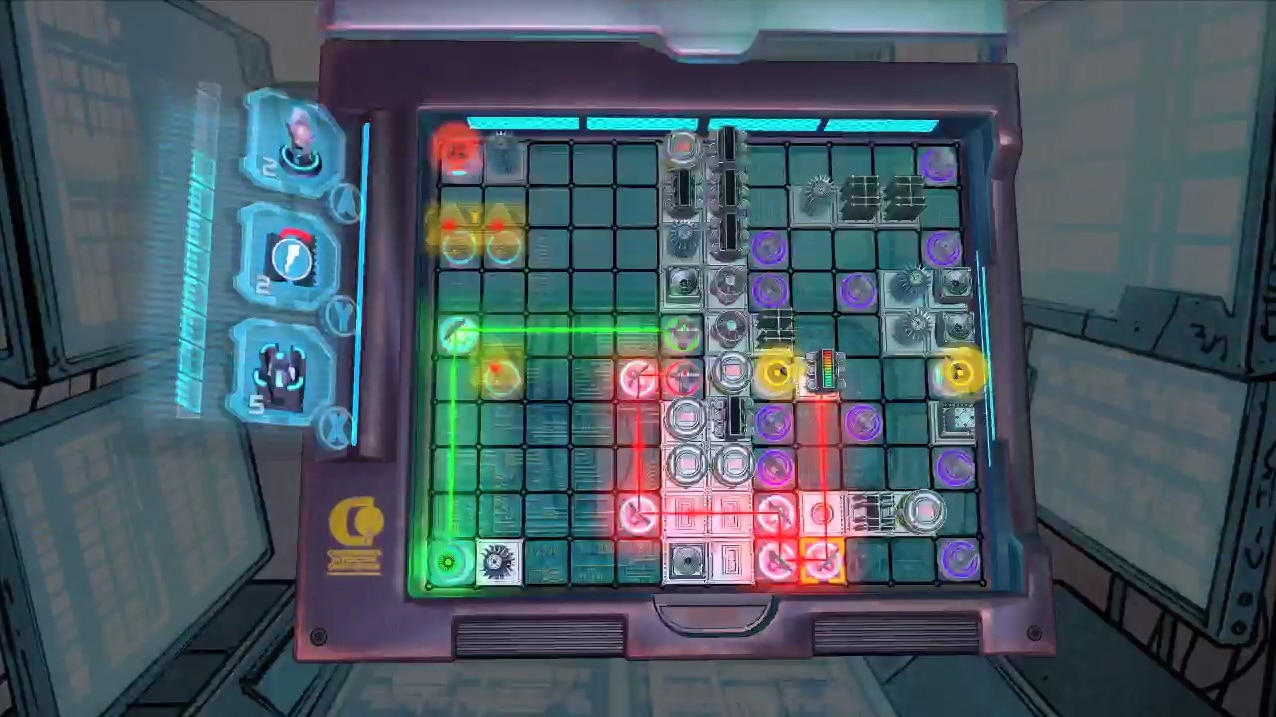
In this Dead Space Ignition walkthrough, you’ll be guided through the beginning to ending moments of cutscenes and gameplay for this downloadable motion comic for Xbox Live Arcade and PlayStation Network.
Hours before engineer Isaac Clarke begins his adventure on “The Sprawl” in Dead Space 2, a Necromorph outbreak occurs — but how did the events unfold? Players witness the horror first-hand in Dead Space Ignition, a downloadable game that takes place on the Sprawl and challenges players to survive the initial Necromorph outbreak.
Dead Space Ignition combines an interactive comic-style story with three unique hacking mini games; Hardware Crack, Trace Route and System Override. Each game offers a fun and satisfying arcade experience that will challenge players with puzzles and twitch gameplay. Dead Space Ignition features a unique “Choose Your Own Adventure” type narrative, allowing players to survive the horrific Necromorph outbreak in multiple ways.
Our Castlevania: Lords of Shadow Brotherhood Arks locations guide for Xbox 360 and PS3 will help you discover the hidden location for all of these collectibles in the game. While you make your way through this Hideo Kojima-produced (creator of Metal Gear Solid) action-adventure, for finding the following collectible will earn you an Achievement and …
Halo: Reach is a single-player shooter game exclusively released for the Xbox 360.
System: Xbox 360 Genre: Shooter Release date: September 14, 2010 in North America, Australia, and Europe. Players: 1 to 16 multiplayer, 2 to 4 co-op Developer: Bungie Publisher: Microsoft Game Studios Origin: America Rating: Mature
Have no time to read the full review? Watch our video review of Halo: Reach.
Our Castlevania: Lords of Shadow Gems locations guide will help you find where all Shadow, Light & Life Gems are located in the Xbox 360 and PS3 versions of this classic series’ 3D revival. While you make your way through this Hideo Kojima-produced (creator of Metal Gear Solid) action-adventure, for finding the following collectibles you’ll …
Our Halo Reach Data Pads locations guide will help you locate and collect all 19 Data Pads hidden throughout the Xbox 360 game.
You’ll find Data Pads littered about the landscape as you play through the campaign. Much like the Audio Logs hidden in Halo 3: ODST they tell a very interesting side-story, which you can read in full here as well. Data Pads 1-9 can be discovered on any difficulty setting, whereas the rest of the Data Pads (10-19) can only be found on Legendary difficulty.
While some can be found from level checkpoints if you reload from a Rally Point, others will not show up once you reach a Rally Point, in which case you’ll have to replay that level to find them.
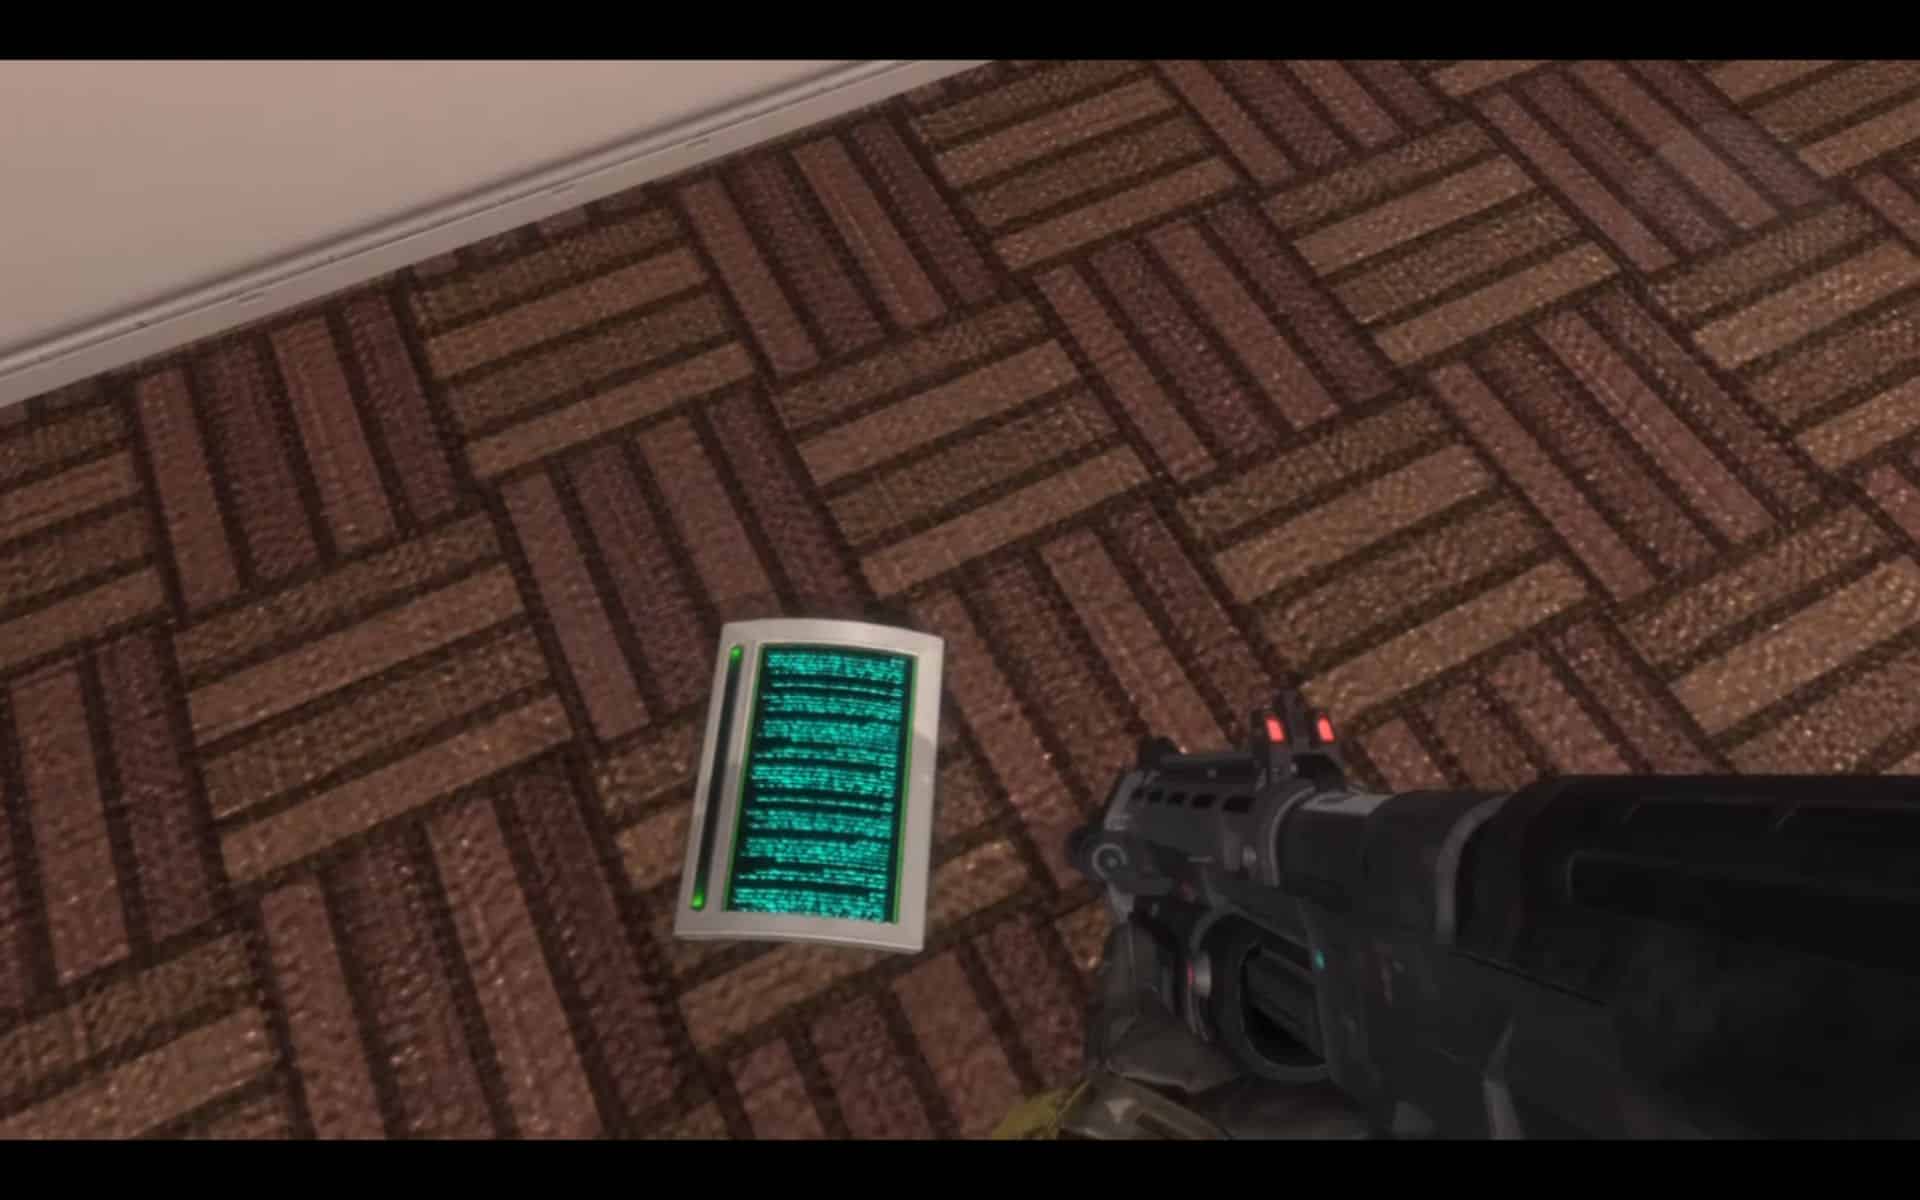
How to find it:
You can get this Data Pad on any difficulty, and load Rally Point Alpha to get it quicker. To find Data Pad #1, it is inside the first bridge you cross after you come across a vehicle that you can choose to drive or not to at all. Once you cross the bridge, it will be up ahead and to the left at the first group of buildings. Around where you can see a “02” printed on a building. It is in the first building to your right as you enter this area. You’ll see a dead corpse slumped against the wall with the Data Pad (with a green screen) beside him.
In this Amnesia: The Dark Descent walkthrough, you’ll be guided through the beginning to ending moments of cutscenes and gameplay for this graphical adventure horror game for PC and Mac (previously known as Lux Tenebras or Unknown) from developer Frictional Games who previously released the Penumbra series. Amnesia: The Dark Descent, a first person survival …
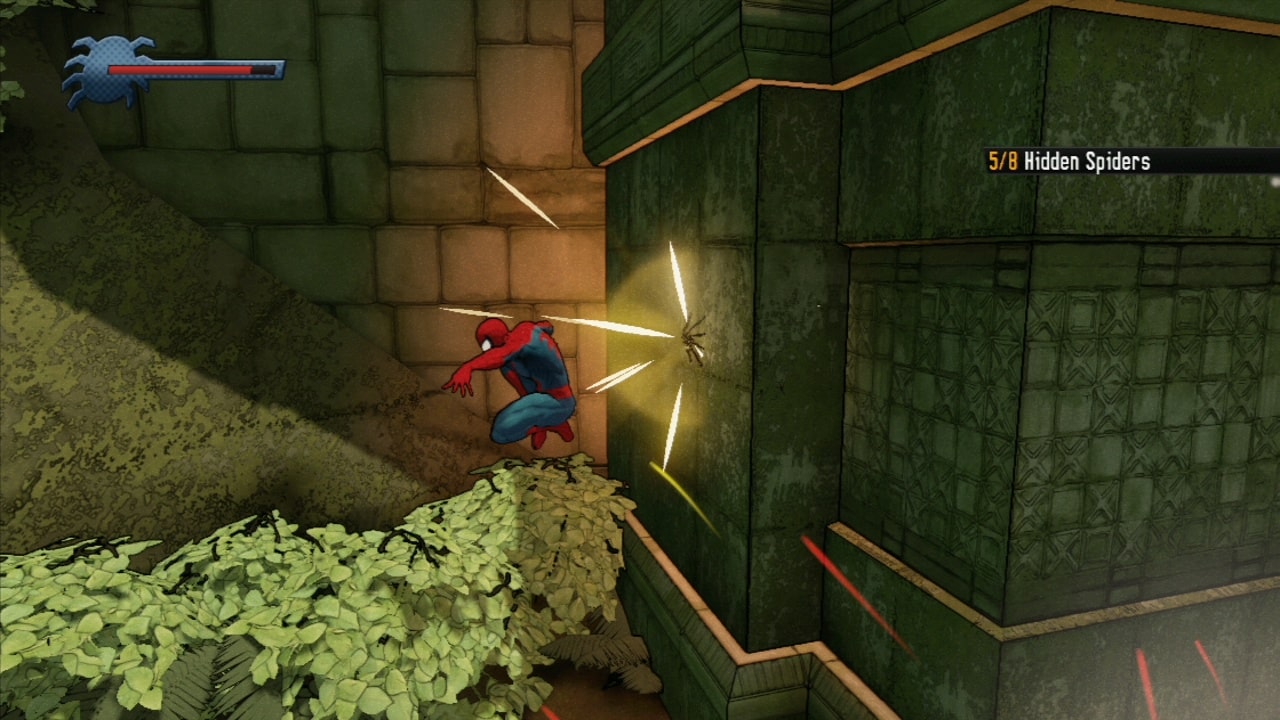
Our Spider-Man Shattered Dimensions Hidden Spiders locations guide will help you find all 96 hidden gold spider collectibles in the new Spider-Man game for Xbox 360, PS3, PC and Wii.
Steve’s location videos on this page will go the extra mile to help you find and show every single secret spider’s hiding spot. Collect all 96 to unlock the “Bug Collector” Achievement (50G) / Trophy (Bronze). There is also a challenge to complete by collecting all these hidden spiders in one level.
Spider Emblems are different from Hidden Spiders, so do not confuse this achievement (Bug Collector) with the 3 achievements related to the Spider Emblems (Hobbyist, Enthusiast, and Fanatic).
Steve has spent 27 hours total making this guide for you, both in-game to record videos and writing down all hidden spider locations! So if this helped you at all, please leave a comment.
Hidden Spider 1 — You can find the 1st one near the end of the first wide open area. Just keep dash jumping and web-zipping across the columns. In the right corner below will be a little area with 5 enemies inside of it. In here it will be crawling on a wall in a corner by the tree. Hidden Spider 2 — You can find the 2nd one after fighting the enemies that Kraven had ordered with machine guns to take positions around the ravine area. Jump to the last column before heading right and look up and towards the left. Perform a web-jump straight up to reach this ledge and collect the spider on the ground. Hidden Spider 3 — You can find the 3rd one the timed area where you have to defeat all the enemies in the given time. It is inside a dead-end entrance. It is on the opposite side of the waterfall. Hidden Spider 4 — You can find the 4th one after the tripwire area, when you reach the upper area of this level look behind you above. The Hidden Spider will be crawling on a green wall. You will need to wall-crawl in order to grab it. Hidden Spider 5 — You can find the 5th one after the cage fight with an enemy and the Kraven. It is just shortly after jumping through the hole in the cage that the Kraven made. Do not head into the next room just yet; the door will close behind you if you do. Instead head to the left side of the entrance, the spider is climbing on the wall. There will also be a Silver Emblem here. Hidden Spider 6 — You can find the 6th one in the room just after where you found Hidden Spider #5. This is also the same room just after the cage fight with an enemy and the Kraven. It will be on the wall to the left as you enter; to the right of the tree. Hidden Spider 7 — You can find the 7th one on the 2nd level of the chamber. It will be inside a small room that is near a set of stairs with enemies. Hidden Spider 8 — You can find the 8th one on the 4th level of the chamber. Right near the switch on the 4th level, look across the chamber and you will see an enemy by himself. The Hidden Spider will be on a column to the left of him.
This video shows how to find all 8 Hidden Spiders in level 1 “Kraven”:
Our Dead Rising 2: Case Zero Achievements guide lists every Achievement for this Xbox 360 downloadable prequel title and tells you how to get them. INDEX OF DEAD RISING 2 CASE ZERO GUIDES: This Page: Achievements Guide New Page: Walkthrough For Fun: Wallpapers Dead Rising 2 Achievements List Earn the Achievement to get the corresponding …
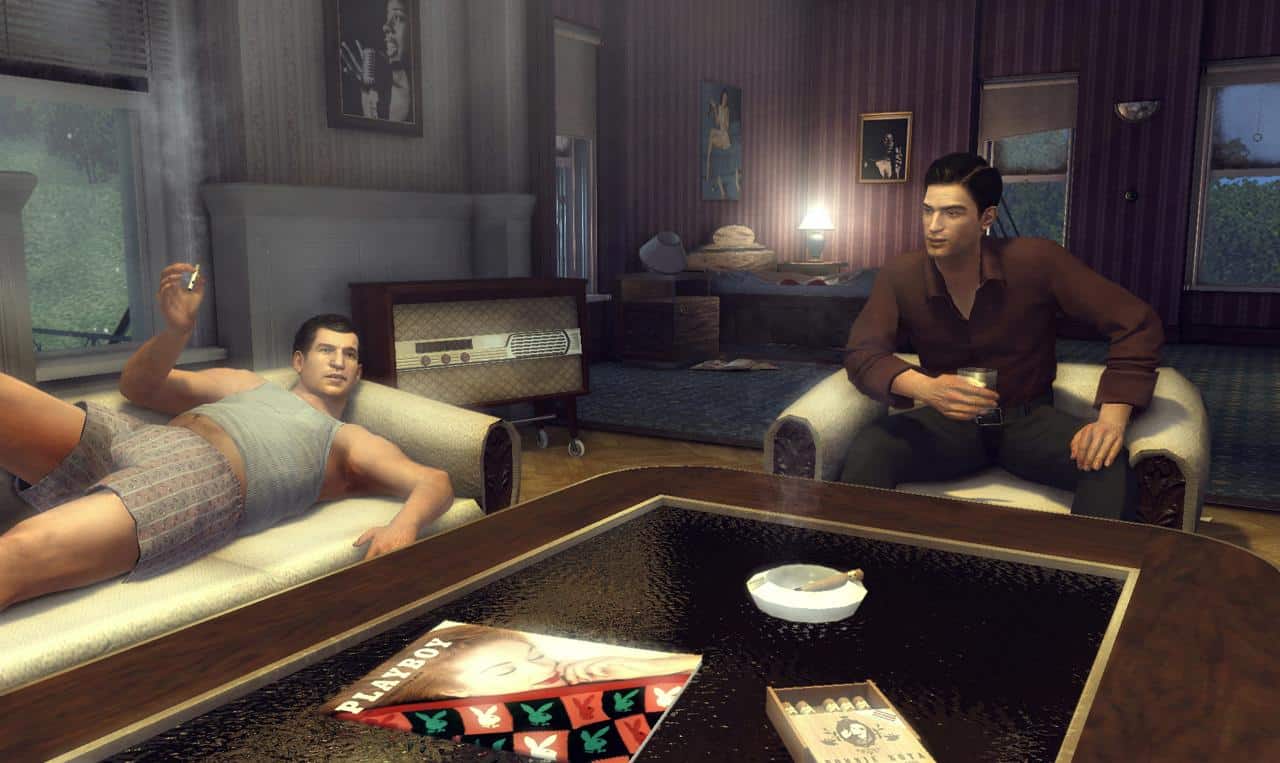
Our Mafia 2 Playboy Magazines locations guide will help you find all 50 collectibles men’s magazines in the new mafia game for Xbox 360, PS3 and PC.
Steve’s location videos on this page will go the extra mile to help you find and show every single Playboy mag. Collect all 50 to unlock the “Ladies’ Man” Achievement (40G) / Trophy (Silver). The first collectible you pick up will also give you the “Collector’s Item” Achievement (10G) / Trophy (Bronze).
Steve has spent 38 hours total making this guide for you, both in-game to record videos and writing down all magazine locations! So if this helped you at all, please leave a comment.
Our Mafia 2 Wanted Posters locations guide will help you find all 159 collectibles in the mafia game sequel on Xbox 360, PlayStation 3 and PC.
In the days after the game’s release, Steve will be adding location maps and videos to this page to help you find every single hidden Wanted Poster. Collect all 159 to unlock the “Card Shop” Achievement (40G) / Trophy (Silver).
Steve has spent 40 hours total, both in-game and writing down all poster locations, on this guide! So if this helped you at all, please leave a comment.