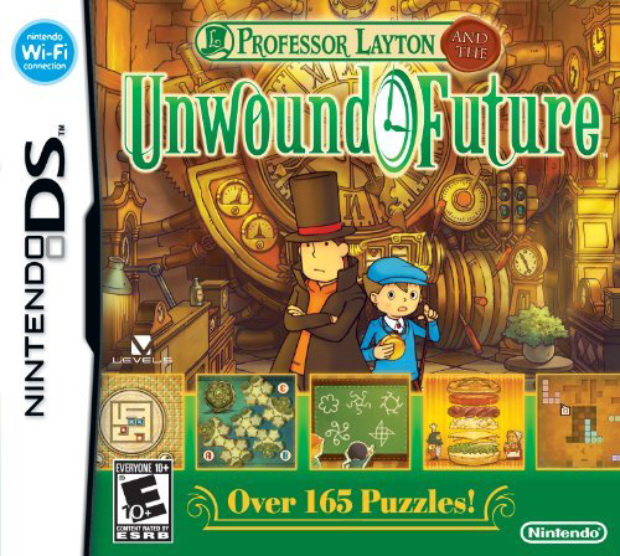
Our Professor Layton and the Unwound Future walkthrough puzzle answers guide gives solutions for each and every question and riddle in the game that’s known as Professor Layton and the Lost Future elsewhere.
There are over 165 puzzles, and you will come across them as you explore the environments (tapping on objects items will initiate a puzzle) and talk to various characters. Puzzles are worth a certain amount of Picarats, which are kinda the game’s currency (or rather, you can use them to unlock bonus features). Tapping suspicious objects in the environment may reward you with a Hint Coin. These can be spent during tough puzzles, allowing you to figure them out easier if you are stuck.
All puzzles you come across are logged and saved in the Puzzle Index in your Trunk (tap the icon on the bottom-right of the screen) where you can replay them at your leisure. Puzzles you haven’t solved can be found within the game by visiting a certain person.
Without further ado, here are the solutions to the game’s puzzles!
Remember, to easily find a puzzle answer, simply press Ctrl+F (hit the control key and the “F” letter key at the same time) to bring up the search box, then type the number of the puzzle you are looking for into the search box and press Enter. This will take you straight to the answer for the puzzle you are looking for.
Pro Trip: Don’t forget to use the “Memo” function when solving puzzles. This allows you to draw or write on the screen and makes solving them a lot easier. Try and draw diagrams or pictures as well, this can help you deduce a puzzle easier. Also don’t forget there is a permanent Memo Pad located at the very bottom of your Trunk (click the green “notebook” icon) where you can save notes ABOUT the game (say there’s a spot you want to remember to come back to. Make a note of it! Don’t forget that you must click “Save” in your Trunk menu and then click to overwrite your save file in order for a memo to be saved.
Pro Tip #2: Write 9’s like you’d write a lowercase letter gee. It won’t work if you write your nine’s with a straight line (that’s how I write mine).
Professor Layton and the Unwound Future Puzzle Solutions Guide
Professor Layton and his apprentice, Luke, receive a confounding letter — from Luke 10 years in the future. But the message inside is even more troubling: London of the future is in disarray, and the only person who can help set things right is Professor Layton.
In this third game in the Professor Layton trilogy, the puzzle-solving professor faces tricky tasks that revolve around jumbled time. More than 165 new puzzles weave seamlessly into the storyline, challenging players with fun, brain-teasing logic puzzles and riddles, and even new types of puzzles.
1. Party Crasher
Answer: First row, third table (red rose, red tablecloth).
Answer description: Good work! You’ve found the party crasher. Now it’s time to let the guard do his job!
2. The Clock Shop
Answer: H
Answer description: Good timing! The answer is H. The times indicate the direction you should follow at each intersection and the order in which to take them. For each time listed, the hour hand on an analog clock points in the direction you should go at each intersection.
3. Bus Scheduling
Answer: E (12:00am)
Answer description: Righty-o! Taking bus E to work at midnight will result in the shortest wait for a ride home. Your bus home leaves at 5:00 a.m.
4. Moving Day
Answer: “3” (three minutes)
Answer description: Correct! It would take three minutes to get all the boxes to the top floor. This puzzle gets a lot easier if you draw a diagram.
5. The Timepiece
Answer: “Hourglass”. It’s the first piece in the first row with the hourglass on it.
Answer description: Exactly! If you look closely, you’ll see an hourglass on the correct panel. Now, look– the door is opening!
6. Needling Needles
Answer: “10”
Answer description: You got it! Thread A goes through 10 needles. Counting those needles sure is hard work!
7. What’s the Time?
Answer: “6:00”
Answer description: Handy! Once you notice exactly where the hour hand is pointing, the rest is pretty easy.
8. The Odd Clock
Answer: “12”
Answer description: Nicely done! Yes, the answer is 12 O’Clock. The only time the hour and minute hands would overlap on a clock like this is 12 O’Clock, though it’s impossible to tell if it’s noon or midnight.
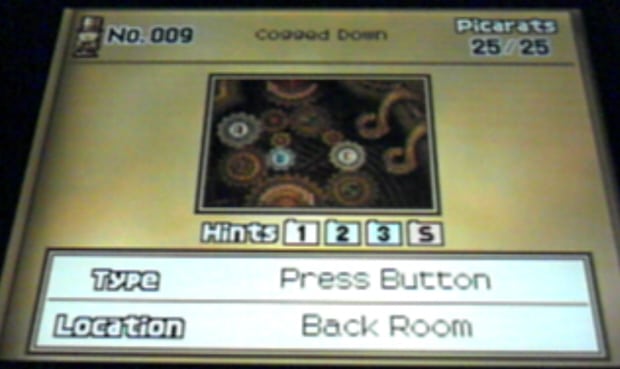
9. Cogged Down
Answer: “B”
Answer description: Excellent! The answer is “B”. If there is an odd number of cogs between the top and bottom cogs, then those two cogs will move in the same direction. However, if there’s an even number of cogs between the top and bottom, they will move in opposite directions. By choosing “B”, there will be five cogs between the two main cogs, so the direction of their rotation will be the same.
10. What Day Is It? 1
Answer: Friday
Answer description: Wow! Friday is the correct answer. It’s easy to figure out once you break it down. Yesterday’s day after tomorrow is Sunday, which means tomorrow must be Sunday, and today is Saturday. Therefore, tomorrow’s (Sunday’s) day before yesterday is Friday!
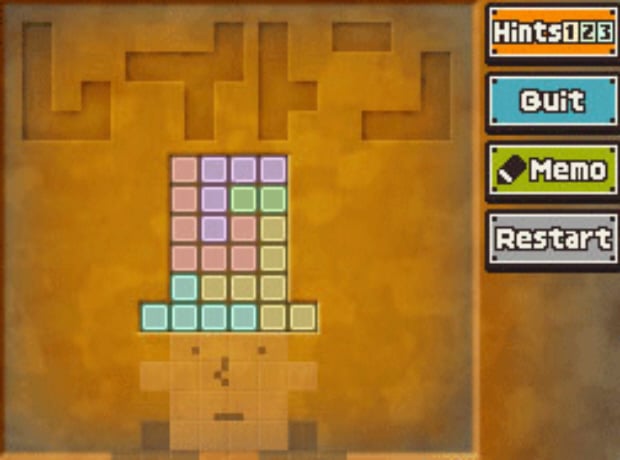
11. The Professor’s Hat
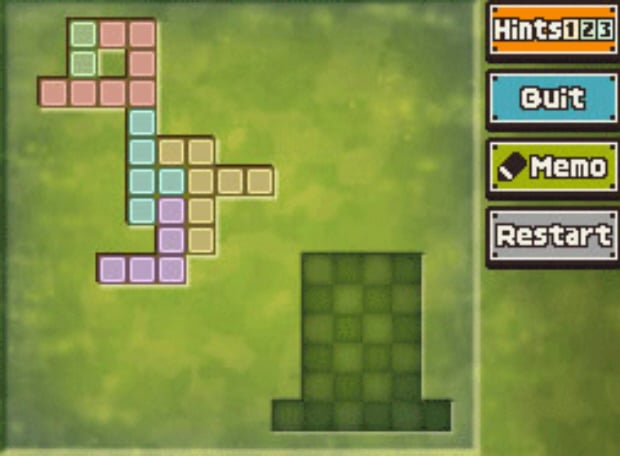
Answer: You must arrange the pieces into the correct slots to fit in Layton’s hat. It’s like Tetris! Arrange the pieces as seen in this photo.
12. Follow the Arrows
Answer: 3 + 4 – 2 = 5 (flip the “1” into a minus symbol after placing each number in the correct spot)
13. Pick the Pen
Answer: C
14. Find the Station
Answer: Top left corner (First box in the first row).
15. Boxes of Matches
Answer: 21
16. What Day Is It? 2
Answer: Sunday
17. The Messy Note
Answer: 8 (or “008”)
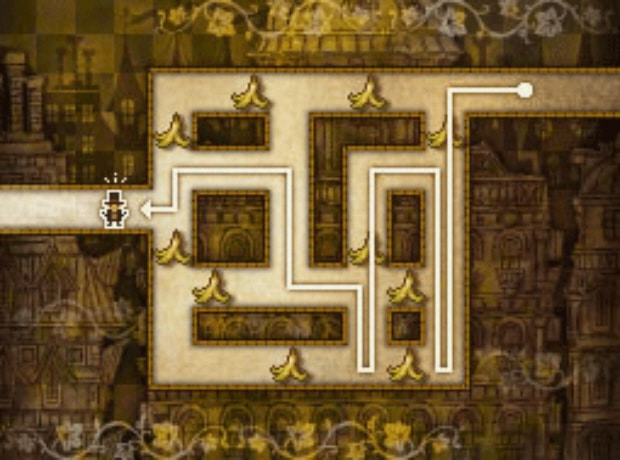
18. Slippery Trip 1
Answer: You must guide the Professor Layton icon correctly through the maze.
19. Checkerboard Bridge
Answer: 15
20. Making the Rounds
Answer: 63 (The box at the far end, Row 1, Column 3)
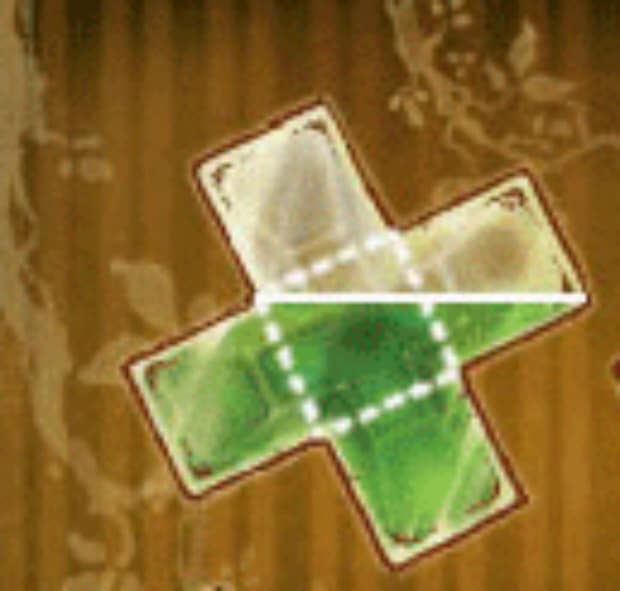
21. Medicine Time
Answer: Draw a line as shown in this photo (the solid line).
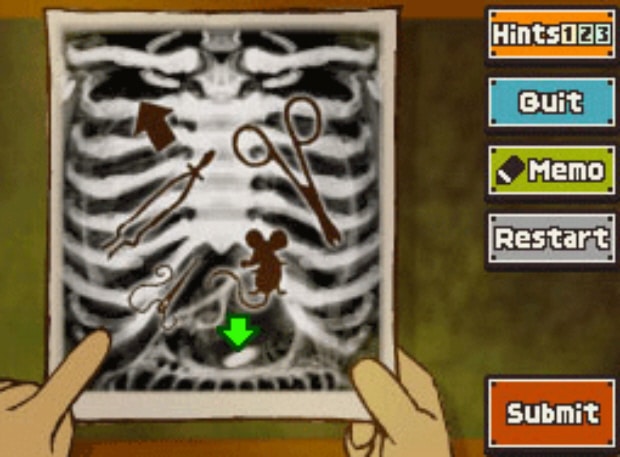
22. X-Ray Vision
Answer: The white “pill” mark on the bottom of his stomach. As seen in this photo.
23. The Secret Number
Answer: 47
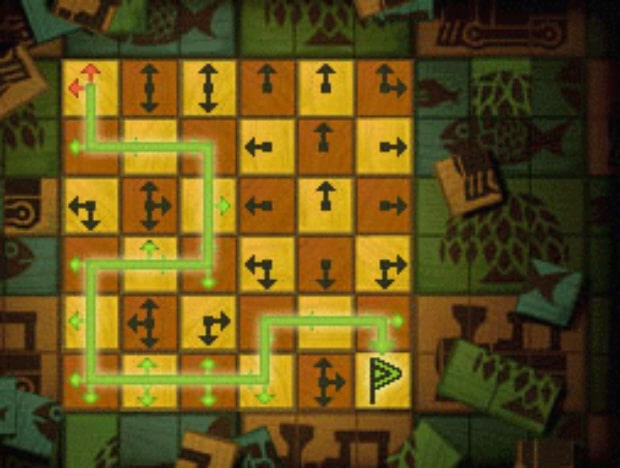
24. No-Go Arrows
Answer: Look for the correct path to follow in this screenshot.
25. Back and Forth
Answer: 5
26. Upon Reflection
Answer: P
27. A Game of Cards
Answer: Circle the Cards of the orange hat-wearing man.
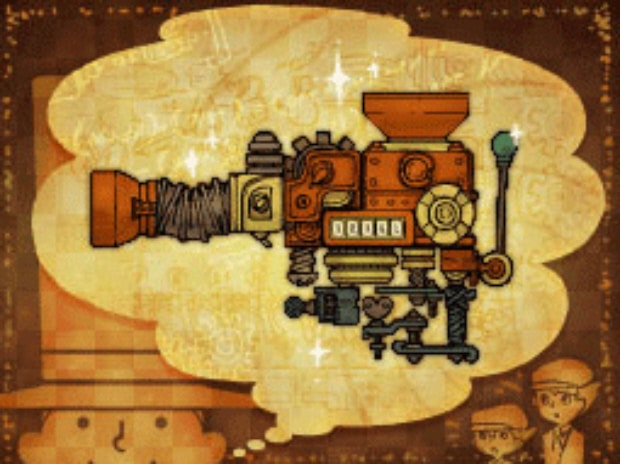
28. Slot Machine Gun
Answer:
You must arrange the pieces into the correct places. Here is the solution.
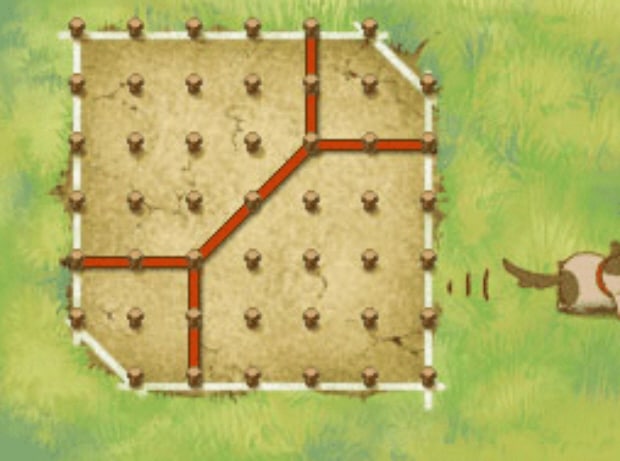
29. Our Dream House
Answer: You must divide as shown in this picture.
30. Cookie Conundrum
Answer: 4
31. False Memory
Answer: B
32. Broken Lance
Answer: C
33. Brothers ‘N’ Sister
Answer: 6
34. The Mysterious Memo
Answer: SOS
35. Twisted Tunnels
Answer: C
36. Hide-and-Goon-Seek
Answer: 9
37. Cat Romance
Answer: C
38. Cluttered Bag
Answer: Slide the items in the following order:
green up, brown up/left, blue up, red jewel up/2 spaces right/down, blue down/left, red jewel up/right/up, blue right, green down, brown down, red jewel all the up.
39. Coat Confusion
Answer: C
40. Missing Tiles
Answer: 5132
41. Carrying Glasses
Answer: B
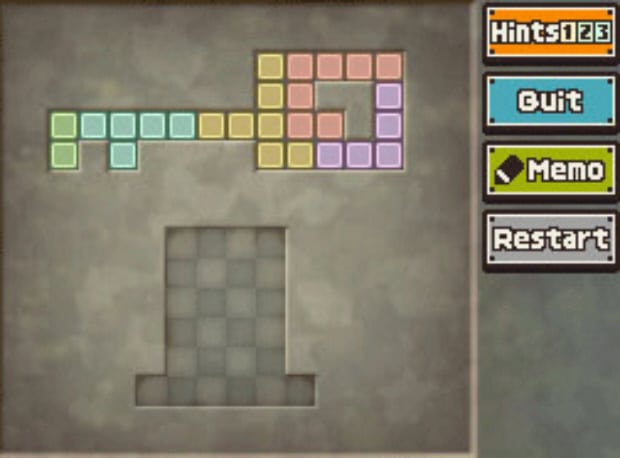
42. Create the Key
Answer: Arrange the blocks to fit into the space of the key, as shown in this photo.
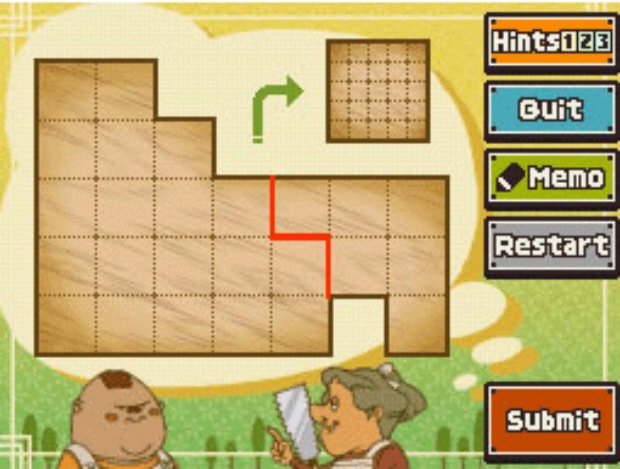
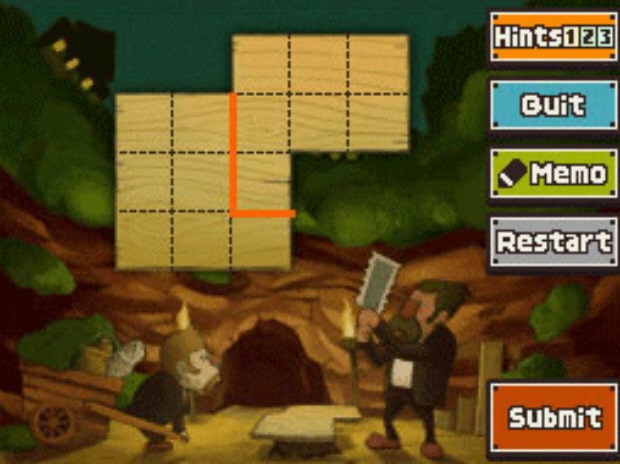
43. Making the Cut
Answer: Cut the wood as shown in this photo.
44. Find the Clock Tower
Answer: H
45. How Many People?
Answer: 37
46. A Heartfelt Heart
Answer: A
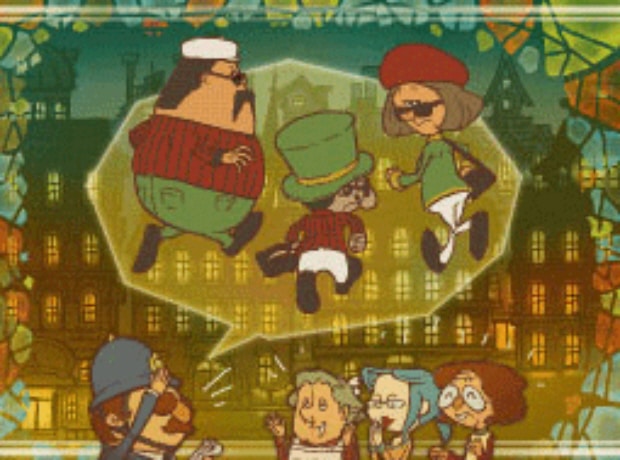
47. The Shady Trio
Answer: Arrange as seen in this photo.
48. 1/1000
Answer: 10CM
49. The Missing Block
Answer: B
50. A Dangerous Place
Answer: The Hospital
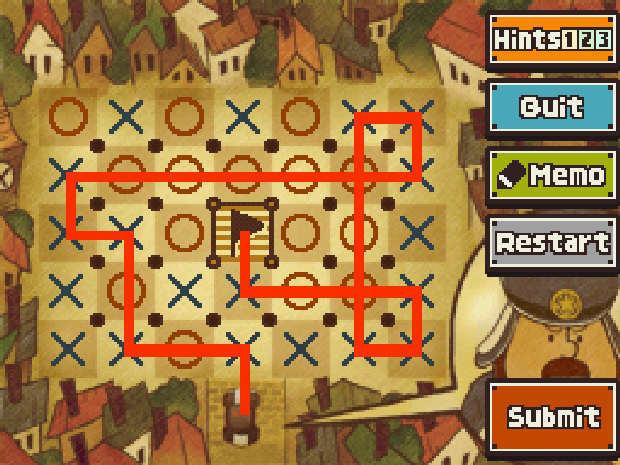
51. Park The Car
Answer:
52. The Checkerboard
Answer: B
53. Making Another Cut
Answer: Cut as shown in this pic.
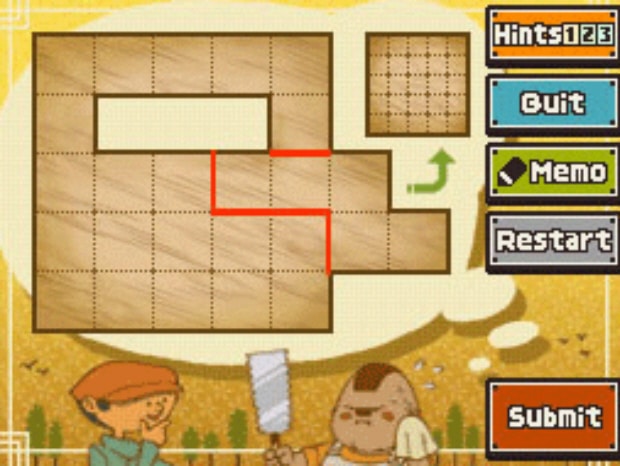
54. Lunchtime
Answer: Arrange as the picture shows you.
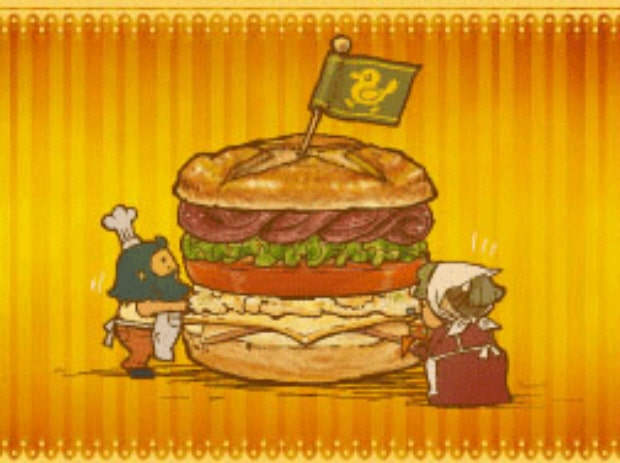
55. Picky Moviegoers
Answer: Make the movie theater as you see in this image.
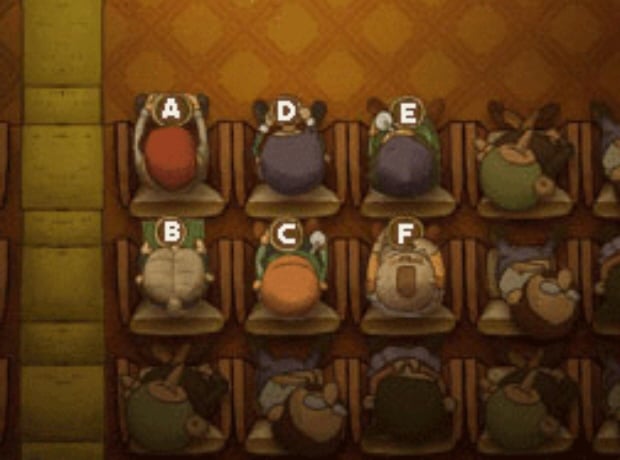
56. Five Stamps
Answer: 3 and 6
57. Mispainted Plates
Answer: 6 and 9
58. Gravity Maze
Answer: Rotate right (clockwise) five times.
59. Leapfrogs
Answer: Jump over (leap) the colored frog in the direction indicated:
red/right, green/left, blue/left, red/right, yellow/right, green/left, blue/left, yellow/right
60. The Inheritance
Answer: A
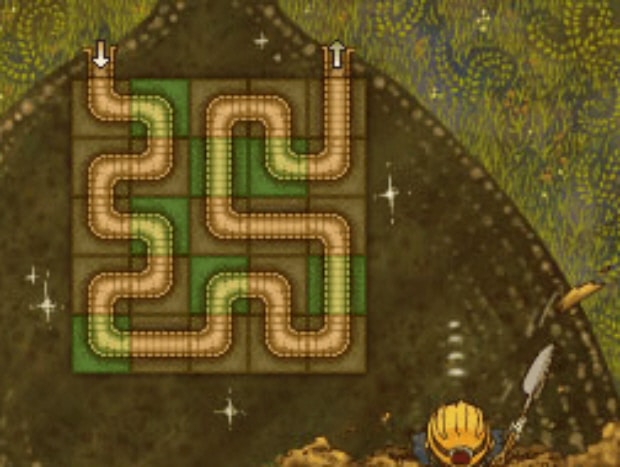
61. A Tunnel Out
Answer: Arrange as seen in this picture.
62. Lunar Leapfrogs
Answer: Jump over (leap) the colored frog in the direction indicated:
red/left, yellow/left, white/right, red/right, black/right, green/left, yellow/left, white/left, red/right, black/right, green/right, yellow/left, blue/right, yellow/left, green/left
63. Which Finger?
Answer: 3
64. Who Broke It?
Answer: C
65. Strange Shapes
Answer: Tap the shape on the bottom left.
66. Faces on Vases
Answer: A
67. Noodling Around
Answer: 1
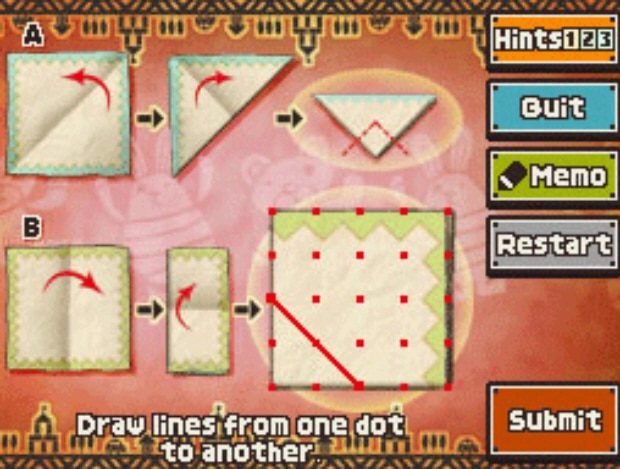
68. Paper Cuts
Answer: Cut as shown in this picture.
69. Which One’s White
Answer: C
70. The Third Youngest
Answer: B
71. Peculiar Paint Job
Answer: White
72. Tricolor Template
Answer: A
73. Tricky Tilework
Answer: Arrange just as you see here.
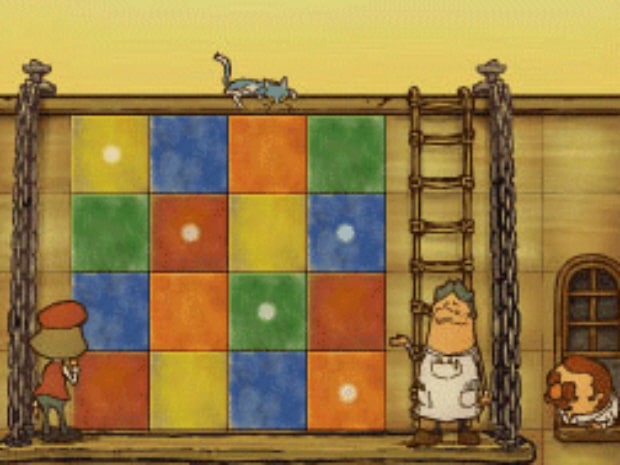
74. Slippery Trip 2
Answer: Follow the route as you see in this image.
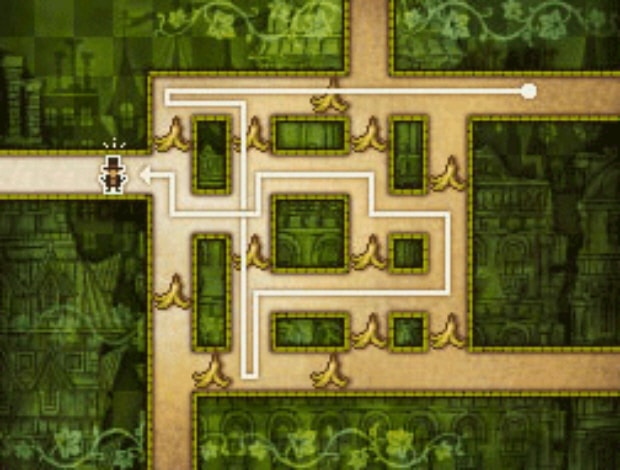
75. Create the Chick
Answer: Arrange as shown.
76. Around the Table
Answer: 5
77. Timely Arrivals
Answer: 20
78. Rabbit Hops
Answer: 20
79. Five Swimmers
Answer: D
80. Making a Scene
Answer: 3
81. Diced Dates
Answer: 6
82. Wheat Stash
Answer: A
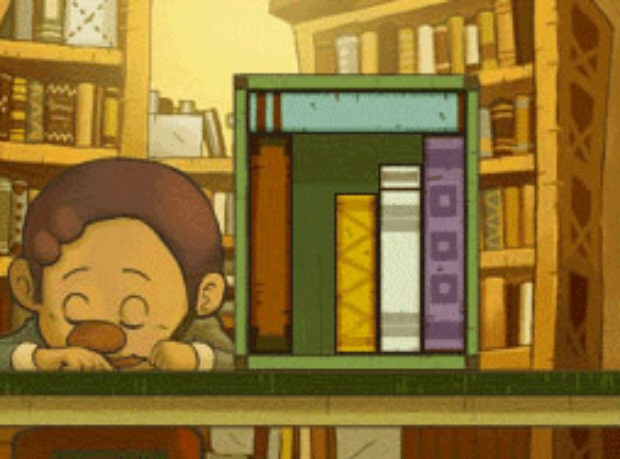
83. Shelve the Books
Answer: Arrange volumes as this picture shows.
84. Crossing the River
Answer: 6
85. More Noodling Around
Answer: 1
86. The Impassable Gate
Answer: Follow these instructions, move the blocks in the corresponding directions.
Slide our heroes left, red/down, blue/right/down/right, orange down/right, green left, orange up/right, green right/down/left, orange left/up/up, green right/up/right, yellow up/right, our heroes left/up, red left, blue down, yellow right/down, green left/down/right, orange down/down/right, our heroes into square at top. Ta-da!
87. Sam’s Allowance
Answer: 0
88. The Discount
Answer: 3 apples, 2 pumpkins, 1 jar of jam
89. Photo Finish
Answer: F
90. Eye of the Dragon
Answer: A
91. Strange Glasses
Answer: G
92. Cave Cover-Up
Answer: Cut as you see in this photo.
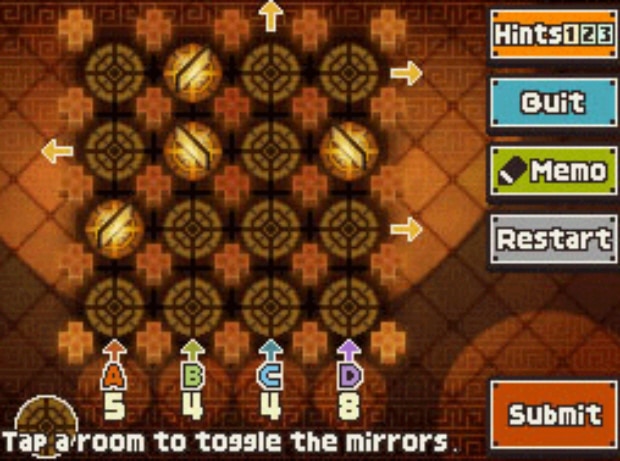
93. The Mirror Maze
Answer: Arrange the mirrors as you see in this picture.
94. The Dragon Bridge
Answer: Slide the shapes as given below to the corresponding directions.
T=right, S=down, L=down/left, Ball=down/right/down/right, L=right/up/right, T=up/left/up/left, L=left/down, Ball=left/down, L=down/right/down, Ball=up/right, T=right/up, S=up/right/up, L=up/left, L=left/down, Ball=down, S=down/right/down, T=down/right, L=up/right/up/right/up, T=left. Phew! That should do it.
95. Looking Up
Answer: D
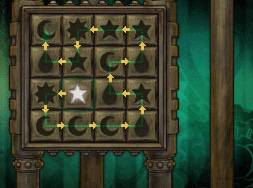
96. The Right Button
Answer: Slide it in a diagonal button next to the bottom left moon.
97. A Blind Escape
Answer: Follow as is shown in this image.
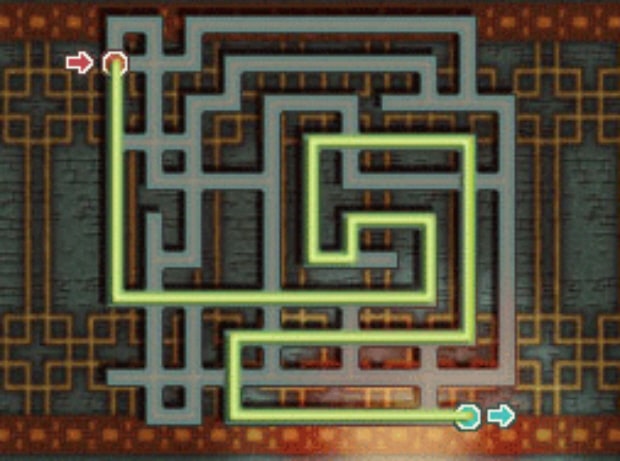
98. Slippery Trip 3
Answer: Follow the route as you see here.
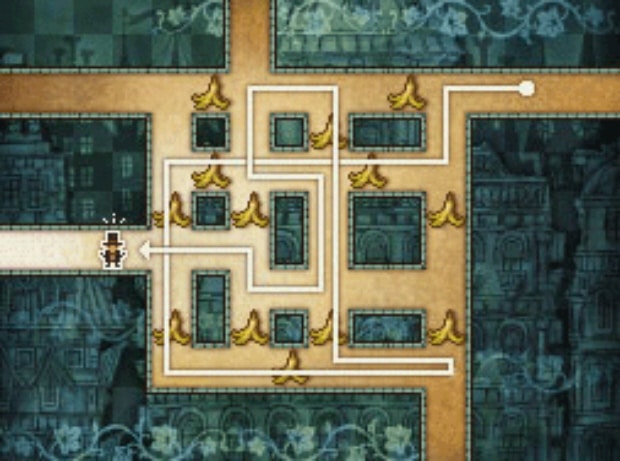
99. An Odd Invitation
Answer: Door on the bottom right (last row, third door)
100. The Lost Number
Answer: 74
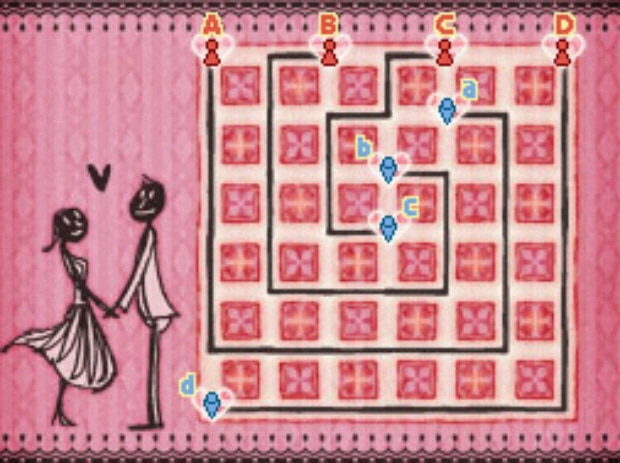
101. Shy Guys and Gals
Answer: Follow the path as seen in this picture.
102. Balance Your Books
Answer: 99 (You bought four books costing 27, 33, 15 and 24 pounds)
103. Pool Problem
Answer: Place the valves as you see in this image.
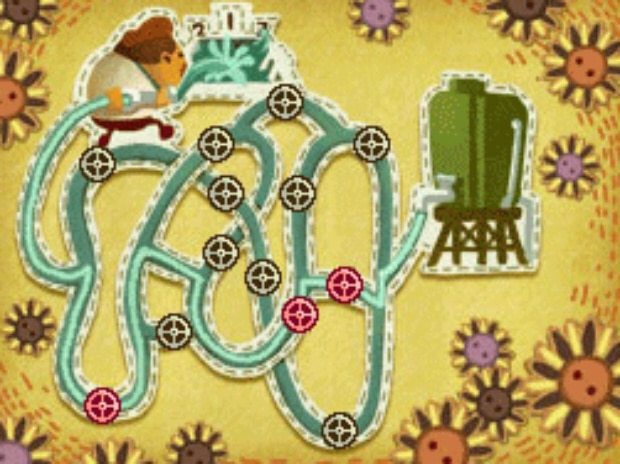
104. The Cake Gobbler
Answer: Tap the girl wearing the pointy blue hat.
105. The Fingerprint
Answer: A
106. Four Stamps
Answer: 3 and 5
107. Chicken Race
Answer: E
108. Dogs and Cats
Answer: 110
109. Three Blocks
Answer: Rotate three times to the right (clockwise).
110. A Zero-Sum Game
Answer: Tap each letter the corresponding number of times shown.
A: 1, B: 9, C: 7, D: 4
111. Follow the Code
Answer: A
112. Beams and Ladders
Answer: Arrange as shown in this photo.
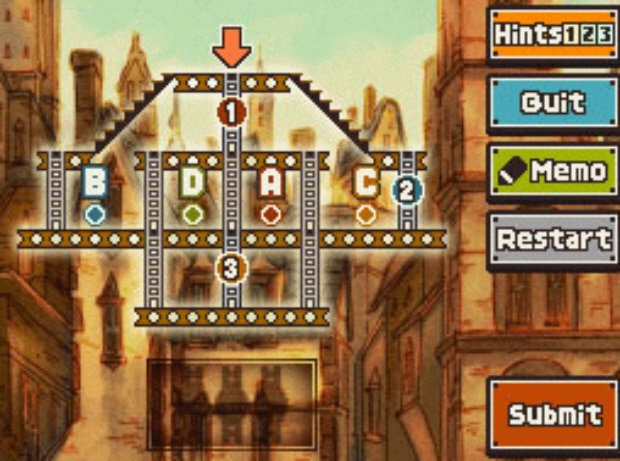
113. One Step at a Time
Answer: The correct path is shown in this screenshot.
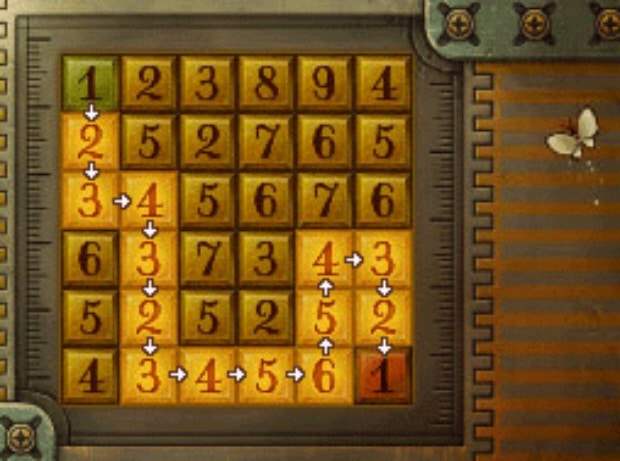
114. Roped In
Answer: Arrange as shown here.
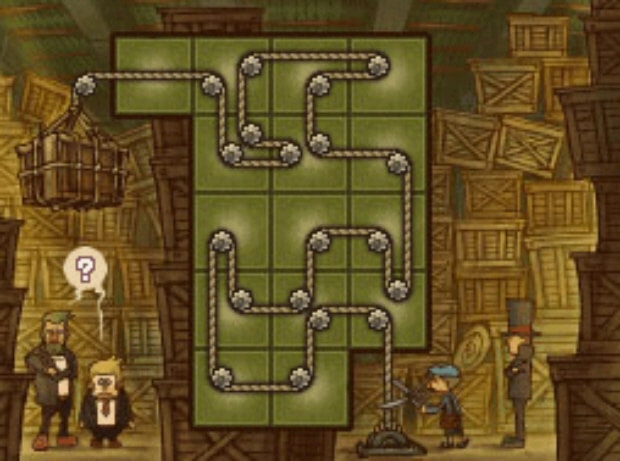
115. Hidden in Plain Sight
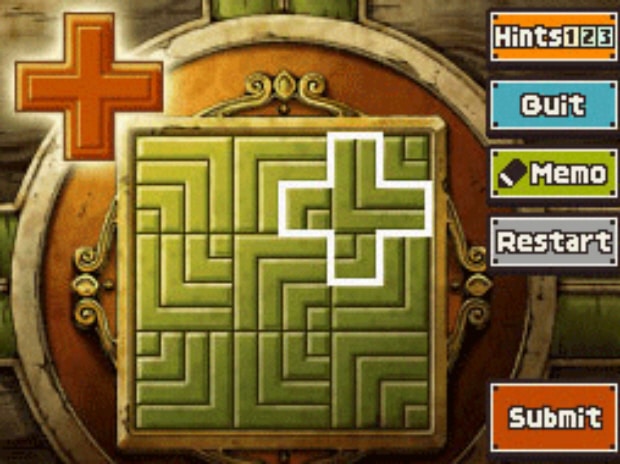
Answer: Trace the plus symbol as you see in this image.
116. Which Way Is Up?
Answer: C
117. Where’s the Arrow?
Answer: The tile you need to lift is located directly beneath the monkey face.
118. Scrutinized Screws
Answer: D
119. Swap to Unlock
Answer: Arrange the dials as you see in this pic.
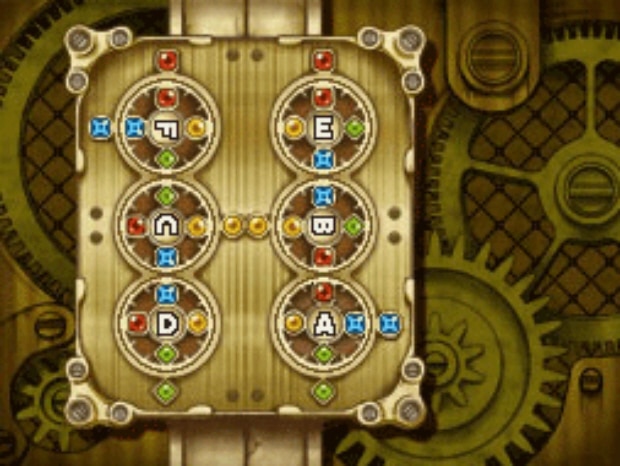
120. A Cryptic Combo
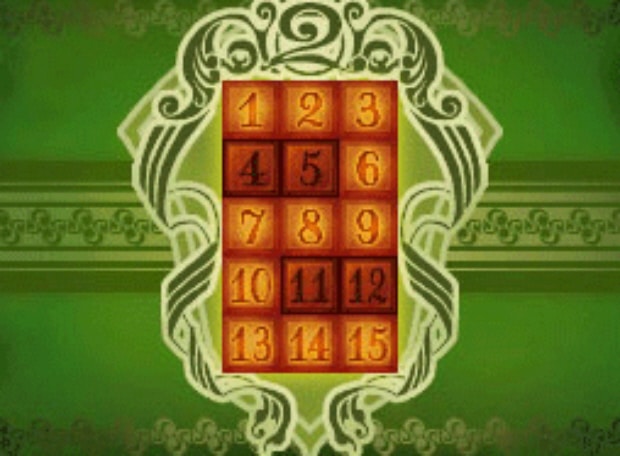
Answer: Make a “2” as you see in this pic.
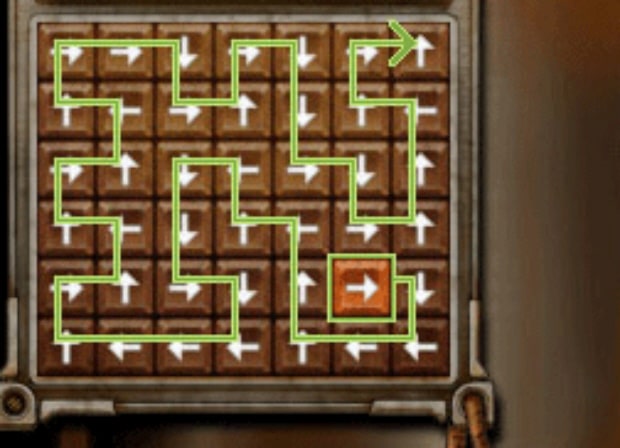
121. Arrow Flow
Answer: See what button in this image.
122. Password Pieces
Answer: 081127
123. Cat’s-Eye View
Answer: 9
124. The Final Tile
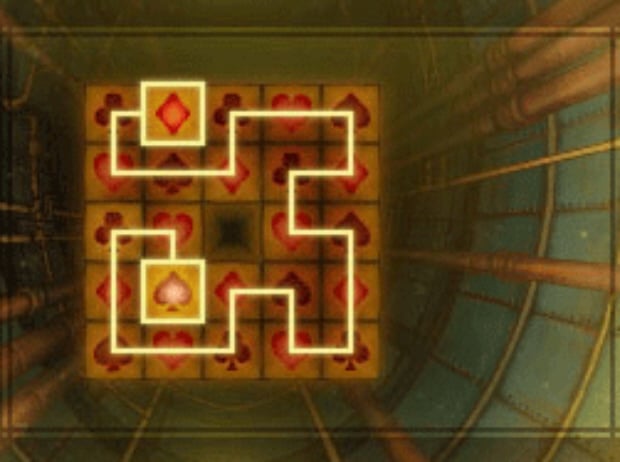
Answer: The spade in the fourth row, second column is your answer. As seen in this pic.
125. Connect the Bots
Answer: The orange glowing dot in this picture gives the answer.
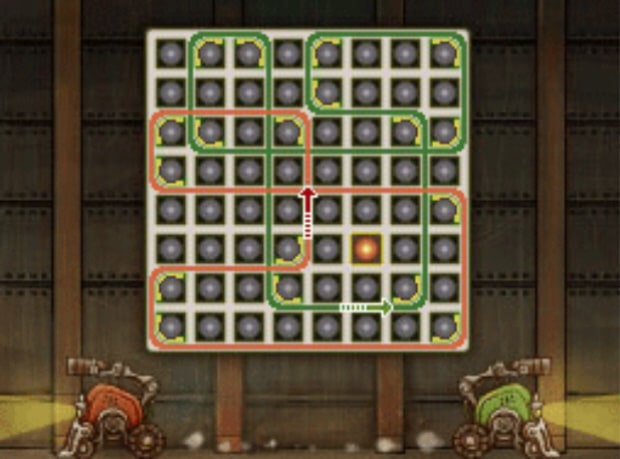
126. Ten-Step Solution
Answer: Slide the bars and blocks in the corresponding direction as indicated:
Top Bar/left, A down/right/down, 2nd to top bar/right, 2nd to bottom bar left/up, B up/left, A left/down, B right, 2nd to top left bar down, 2nd to top bar left, B left/up
127. A Real Heart Swapper
Answer: Middle row, 2nd and 4th blocks (swap them)
128. Reverse Rotation
Answer: Arrange B and C as seen in this image.
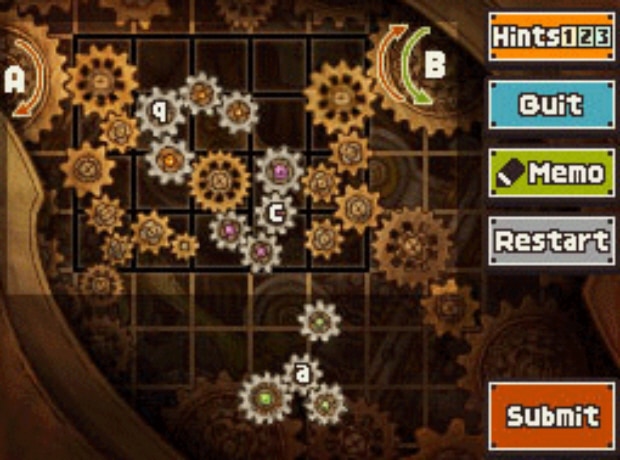
129. Block Blockade
Answer: Put the bombs as you see in this picture.
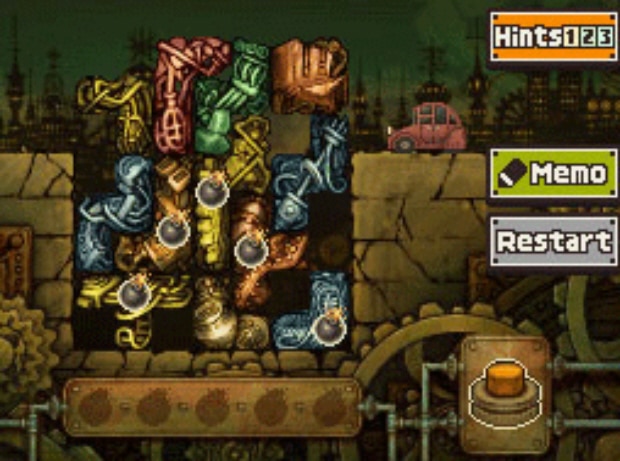
130. The Final Puzzle
Answer: C
131. A Pricey Pen
Answer: 270
132. Calendar Collage
Answer: 1
133. The Two Necklaces
Answer: Follows these oh-so-confusing-and-long instructions! Slide the corresponding block in the direction indicated:
red=down, red=left, red=up, blue=left, blue=left, blue=down, blue=right, red=right, red=right, red=up, blue=left, blue=left, red=down, blue=right, blue=up, bottom blue=left, blue=up, bottom red=right, bottom blue=down, red=right/up, blue=up/left, red=down, red=right, red=right, left red=up, left blue=left, left red=down, right red=down, red=right, red=up/left, red=left/up, blue=left, red=up/right, red=down, red=right/down, blue=down/left, blue=left/down, red=right, red=right, red=up/right, blue=left, blue=left, red=down, red=right, blue=up/left, red=left/up, blue=left, red=up/right, red=down once, red=right, red=up. OMFG. 😛
134. A Question of Taste
Answer: C
135. Four Jams
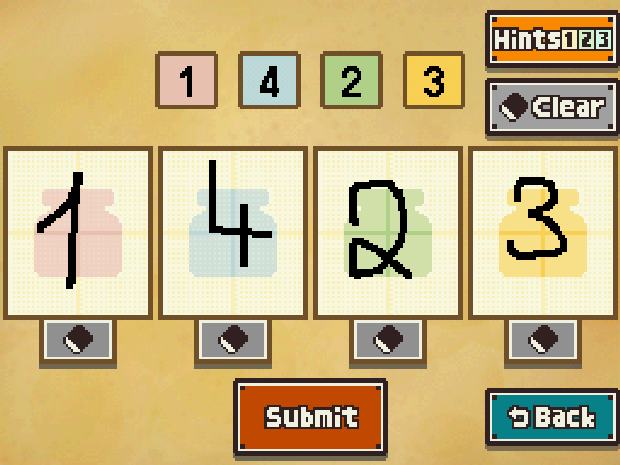
Answer: 1, 4, 2, 3 as seen in this image.
136. Destination Station
Answer: D
137. Pieces of Chocolate
Answer: 8 (Take 5 pieces horizontal from the left side of the chocolate, discard the one with the hole and get another 4 vertical from the right side). Thanks to Citivolus for this tip. 🙂
138. Quirky Clockwork
Answer: C
139. Bricks ‘n’ Bullion
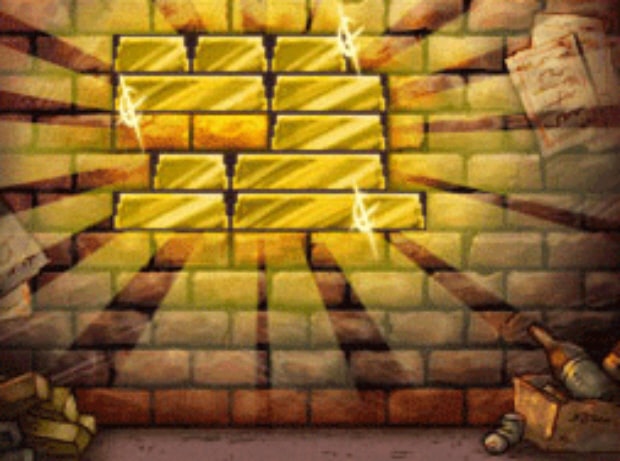
Answer: Arrange as this pic shows.
140. Ripple Effect
Answer: 6
141. A Roll of the Die
Answer: Upside-down heart
142. The Marked Cup
Answer: A
143. Double Digits
Answer:
You must cut the board in the shape of a number. The answer is a 4, it will look something like this:
0-0–
0-0–
0-0–
0000
–0–
144. Mr 8:20
Answer: E is Mr 8:20
145. Time Cards
Answer: 20
146. Birds on a Wire
Answer: 2
147. Paving the Garden
Answer: E
148. Matchstick Math
Answer: 0
149. Strange Symbols
Answer: C (52)
150. Half as Old
Answer: 9
151. A Difference of 39
Answer: 98 and 59
152. Cluttered Cans
Answer: Move the cans as indicated below. The first column is “Stack #1”, second column is “Stack #2”, third column is “Stack #3”.
Step 1: Move two of the cans from Stack #2 to Stack #1.
Step 2: Move one of the cans from Stack #3 to Stack #2
Step 3: Move four of the cans from Stack #1 to Stack #2.
Step 4: Move one of the cans from Stack #2 to Stack #1.
Step 5: Move one of the cans from Stack #3 to Stack #1.
Final Step: Move two of the cans from Stack #2 to Stack #3.
153. An Extra Block
Answer: The block made up of two triangles (diamond)
154. A Stacked Deck
Answer: 3 (more black than red cards)
155. Three More Blocks
Answer: Rotate the board in the following directions indicated (right=button on right side, left=button on left side, x=click it that many times):
right, left, rightx4, left, rightx2, left, rightx4, left, rightx2, left, rightx4, leftx6, right, leftx2, right
156. ABCs … and Ds
Answer: Slide the stones in the directions indicated:
bottom blue=right, C=down, top blue=left/up, D=left, bottom blue=up/right, A=Up, C=right/down, B=right, D=down/left, top blue=down, A=left/up, top blue=left, B=up/right
157. The Crazy Keyholes
Answer: Keyholes A, B, D, F and G will work
158. From A to D
Answer: 20
159. The Impassable Gate 2
Answer: Slide the blocks in the corresponding directions.
yellow=up/right, our heroes=left, red=down, yellow=down, blue=down/left/down, yellow=up, red=up, our heroes=right, blue=down/right, yellow=left/down, green=right/down, brown=left/left/up, green=up/left, red=up/left, our heroes=right/up, blue=right one space, yellow=down, red=left, our heroes=left/up, red=right/down, our heroes=down/left/down/left, green=right two spaces/down/right, brown=down two spaces/right, our heroes=top square
160. Dirt Patchwork
Answer: 16
161. Black Hat, White Hat
Answer: Arrange around the outside as shown in this image.
162. Cluttered Cans 2
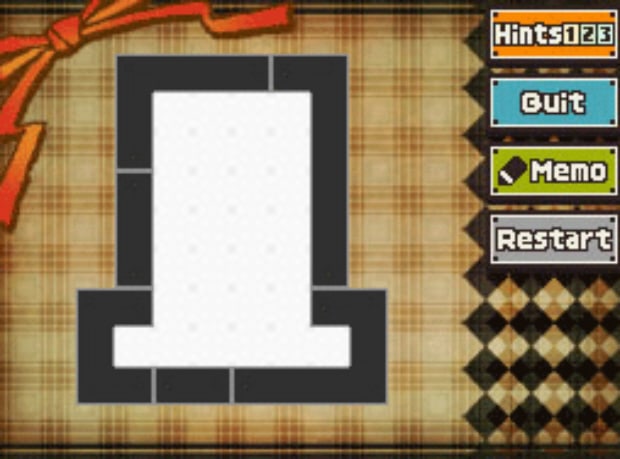
Answer: Move the cans as indicated:
Step 1: Move one of the cans from Stack #4 to Stack #1
Step 2: Move one of the cans from Stack #2 to Stack #4
Step 3: Move two of the cans form Stack #3 to Stack #2
Step 4: Move one of the cans from Strack #3 to Stack #1
Step 5: Move four of the cans from Stack #1 to Stack #3
Step 6: Move three of the cans from Stack #2 to Stack #1
Step 7: Move one of the cans from Stack #2 to Stack #3
Step 8: Moe one of the cans from Stack #2 to Stack #1
Step 9: Move four of the cans from Stack #3 to Stack #2
Step 10: Move two of the cans from Stack #4 to Stack #3
Step 11: Move one of the cans from Strack #4 to Stack #2
Step 12: Move five of the cans from Stack #1 to Stack #4
Step 13: Move one of the cans from Stack #2 to Stack #1
Step 14: Move two of the cans from Stack #4 to Stack #1
163. Time Times Three
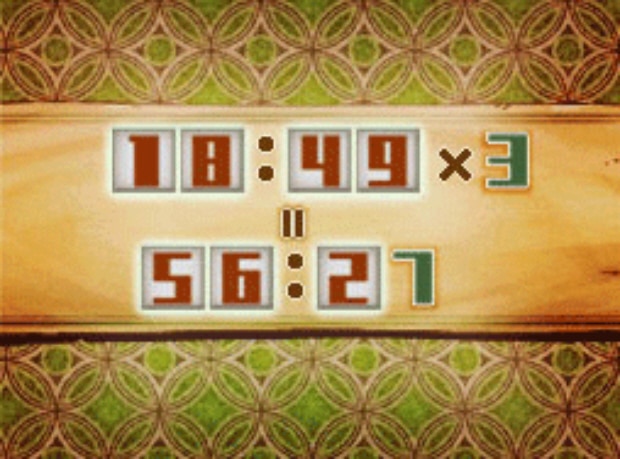
Answer: Look at this screenshot.
164. Calendar Conundrum
Answer: 18
165. One Big Necklace
Answer: Slide the block in the corresponding direction.
Left, Left, Left, Up, Right, Right, Right, Down, Left, Left, Up, Left, Down, Right, Right, Right, Up, Left, Left, Up, Up, Right, Right, Down, Down, Left, Left, Left, Up, Up, Right, Right, Right, Down, Down, Left, Up, Left, Up, Right, Down, Down, Left, Up, Up, and Left. :/
166. Perplexing Produce
Answer: Rotate or swap the squares as indicated to complete the picture.
Step 1: Bottom Right square rotate half a turn.
Step 2: Swap the bottom right and top right squares.
Step 3: Rotate the bottom right square a quarter turn right.
Step 4: Swap the bottom right and top left squares.
Step 5: Rotate the bottom right square a quarter turn right.
Step 6: Swap the bottom right and middle squares.
Step 7: Rotate the bottom right square a quarter turn left.
Step 8: Swap the bottom right and middle left squares.
Step 9: Swap the bottom right and bottom left squares.
Step 10: Swap the bottom right and top middle squares.
Step 11: Rotate the bottom right square half a turn.
Step 12: Swap the bottom right and bottom middle squares.
Step 13: Rotate the bottom right square a quarter turn left. DONE!
167. Impassable Gate 3
Answer: Slide the blocks in the corresponding directions.
green=down, blue=left, heroes=right, yellow=left/down, fuchsia(redpurple)=down/right, yellow=up, heroes=left, purple=down, fuchsia=down/left, purple=up, heroes=right, fuchsia=down/left, yellow=down/right, blue=right/down, red=right/down, skyblue=left two spaces/up, red=up/right, blue=up/left, yellow=left/up one space/left, purple=left/down, red=left/down/right, yellow=right/up, green=up, red=left, heroes=up, purple=right, fuchsia=right, red=down/left/down, heroes=left/down/left, yellow=down/right/down one space/right, skyblue=down two spaces/left, heroes=top square. WOOT
168. The Time Machine
Answer: Slide the shapes in the corresponding directions:
Step 1: Top L=left
Step 2: Red Orb=Left/Up/Left
Step 3: Large L=left/down
Step 4: Top small L=right
Step 5: Z=up/right/up
Step 6: Large L=left
Step 7: T=Up
Step 8: Top Small L=left/down/left/down
Step 9: T=down/right/up
Step 10: Large L=right
Step 11: Bottom left small L=up/left/up
Step 12: Large L=down/left
Step 13: Bottom small L=Up
Step 14: Bottom Small L=left/down
Step 15: T=down/left/down
Step 16: Middle small L=down
Step 17: Top Small L=down/right/down/right
Step 18: Middle small L=Up
Step 19: T=up/left
Step 20: Small Bottom L=right/up/right
Step 21: T=right/down
Step 22: Large L=right/down
Step 23: Top Small L=down one space/right
Step 24: Z=Right
Step 25: Red Orb=right
Step 26: Left Small L=Up
Step 27: Z=down/left
Step 28: Top Small L=left/up/left
Step 29: Z=right/up/right
Step 30: Left Small L=down/right
Step 31: Red Orb=down/right/down
Step 32: Top Small L=down/left
Step 33: Z=Up
Step 34: Red Orb=right
Step 35: Z=left/down
Step 36: Top Left Small L=right
Step 37: Top Right Small L=left/up
Step 38: T=Up
Step 39: Bottom Right Small L=Left
GAME COMPLETION GET! 🙂
Puzzle Battle 1
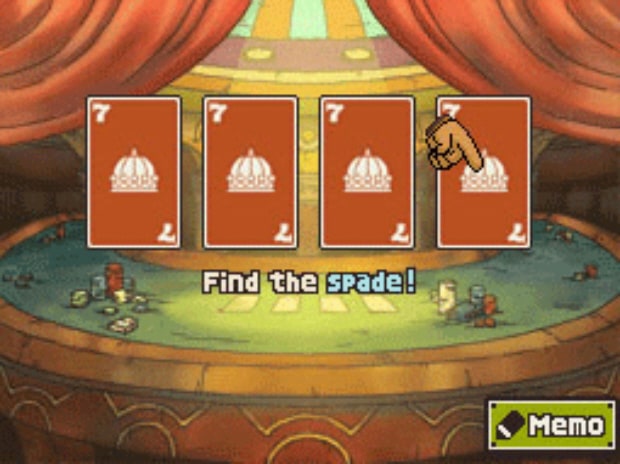
Answer: Card #4 (the one all the way to the right, as seen in this photo).
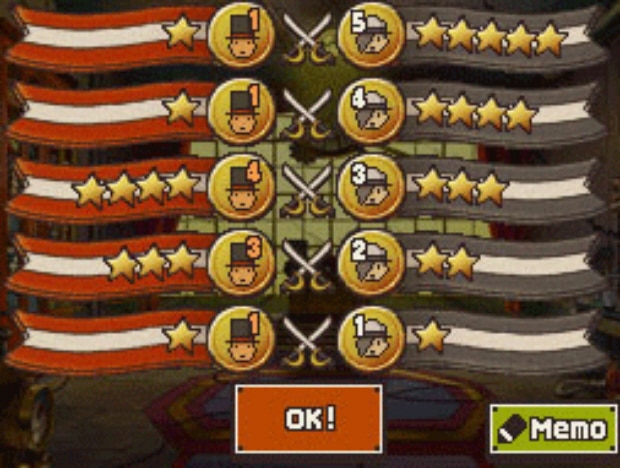
Puzzle Battle 2
Answer: You’ll need to arrange Professor Layton’s troops as seen in this photo.
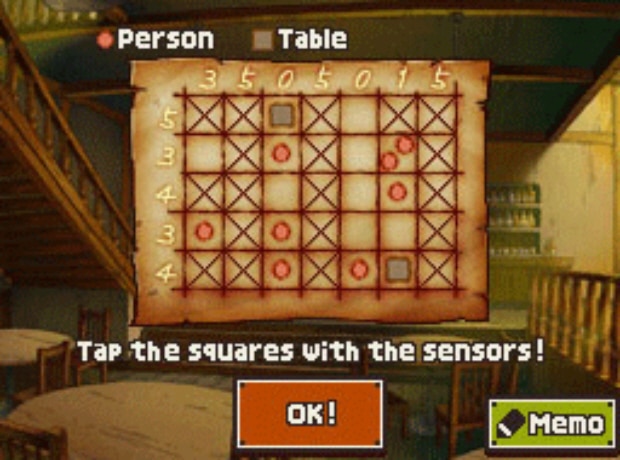
Puzzle Battle 3
Answer: Place the sensors as seen in this photo.
Weekly Puzzle #1. Ten-Cent Increments
Answer: 10, 20, 40 and 80
FULL VIDEO WALKTHROUGH
Part 1: Intro
Part 2 – Intro 2
Part 3: Prologue
Part 4: Prologue 2
Part 5: Chapter 1
Part 6: Chapter 2
Part 7: Chapter 1[3 of 4]
Part 8: Chapter 1[4 of 4]
Part 9: Chapter 2[1 of 3]
Part 10: Chapter 2[2 of 3]
Part 11: Chapter 2[3 of 3]
Part 12: Chapter 3[1 of 3]
Part 13: Chapter 3[2 of 3]
Part 14: Chapter 3[3 of 3]
Part 15: Chapter 4[1 of 3]
Part 16: Chapter 4[2 of 3]
Part 17: Chapter 4[3 of 3]
Part 18: Chapter 5[1 of 2]
Part 19: Chapter 5[2 of 2]
Part 20: Chapter 6[1 of 3]
Part 21: Chapter 6[2 of 3]
Part 22: Chapter 6[3 of 3]
Part 23: Chapter 7[1 of 5]
Part 24: Chapter 7[2 of 5]
Part 25: Chapter 7[3 of 5]
Part 26: Chapter 7[4 of 5]
Part 27: Chapter 7[5 of 5]
Part 28: Chapter 8[1 of 2]
Part 29: Chapter 8[2 of 2]
Part 30: Chapter 9[1 of 4]
Part 31: Chapter 9[2 of 4]
Part 32: Chapter 9[3 of 4]
Part 33: Chapter 9[4 of 4]
Part 34: Chapter 10[1 of 4]
Part 35: Chapter 10[2 of 4]
Part 36: Chapter 10[3 of 4]
Part 37: Chapter 10[4 of 4]
Part 38: Chapter 11[1 of 2]
Part 39: Chapter 11[2 of 2]
Part 40: Chapter 12[1 of 3]
Part 41: Chapter 12[2 of 3]
Part 42: Chapter 12[3 of 3]
Part 43: Chapter 13[1 of 3]
Part 44: Chapter 13[2 of 3]
Part 45: Chapter 13[3 of 3]
Part 46: Epilogue[1 of 2] (ENDING PART 1)
Part 47: Epilogue[2 of 2] (ENDING PART 2)
Part 48: Credits
Part 49: Toy Car
Part 50: Parrot
Part 51: Picture Book
Part 52: The Storyteller’s House
Part 53: The Hotelier’s House
Part 54: The Messenger’s House
Part 55: The Time Traveler’s House
Part 56: The Puzzle Keeper’s House
Part 57: The Hidden Door
Part 58: Weekly Puzzles[No.w1-19]
Part 59: Weekly Puzzles[No.w20-35]
Thanks to Devil’s Advocate for images and to Blaqdymun, Kelly and Citivolus for more puzzle answers and to mikey11190 for the walkthrough videos.
Please comment if you need help solving a certain puzzle, or if you want to share puzzle solutions that we don’t have listed yet. We’ll credit you for helping out!
